

This guide has been heavily inspired by the great work of Marcus Montgomery on LinuxSupport.Tech
You can read it here: https://linuxsupport.tech/how-to-host-foundry-vtt-on-raspberry-pi/
I created this guide following my own experience setting up my server with these premises:
Self Hosting on a regular ISP (with dynamic IP) using a dynamic DNS service (DynuDNS) on a Raspberry Pi 4b 4gb with the latest Raspberry Pi OS.
For more details on the hardware I used, please refer to this page: Foundry VTT Hosting on Raspberry Pi (hardware) – martinpilon.ca
Folders were created at the home level for easy access, with the nomenclature “foundry” and “foundry2” (second instance) for the software folders and “data” and “data2” (second instance) for Foundry’s data folders.
Throughout this installation you will need to use the terminal app in Raspberry Pi OS or remote SSH through Windows (see instructions at the end of this guide). *I really recommend the first option*.


Here’s a summary of the steps:
- DynamicDNS
- Install Pi OS
- Fixed IP (Pi OS)
- SSH (Pi OS)
- Router Port forwarding (80 & 443)
- UFW (Firewall Pi OS)
- Fail2ban (Protection Pi OS)
- Foundry/Node.js/nginx install (I’ve grouped these 3 together as they are slightly intertwined)
- SSL (Snap/Certbot)
- Crontab (autostart)
- Setup SFTP (optional)
- SSH using Windows 10 (remote terminal) (optional)
- VNC (Virtual Network Computing) (optional but recommended!)
- Backups! (Clone SD Card) (optional but highly recommended!)
- Add Temperature Display to Raspberry Pi OS (optional)
- CPU, RAM and SWAP usage (optional)
- *NEW* Move your install to an external SSD (optional)
- *NEW* Updating Raspberry Pi and Node.js to the latest version
1- Setting up a DynamicDNS address (ex: DynuDNS https://www.dynu.com/) pointing at your IP through a DDNS service.
I personally used DynuDNS free service for that, here’s their guide on setting up a dynamic DNS address:
Getting started | Free Dynamic DNS Service (dynu.com)
As for the auto-update of the IP address (for dynudns), You can create a script in Raspberry Pi and setup a cron job to run every 5 minutes to keep your hostnames updated to the most current IP address. You can find the instructions here:
Raspberry Pi | Free Dynamic DNS Service | Dynu
2- Install Raspberry Pi OS on a microSD Card using the Raspberry Pi Imager
Note: You will need a Micro SD Card writer USB adapter and a PC for this step.
This is a pretty much straightforward process, using the hyper-friendly app from raspberrypi.org! In “Choose OS” select the first option “Raspberry Pi OS (32-BIT)”, then select your SD Card and press “write”.

https://www.raspberrypi.org/software/
3- Setting up fixed IP in the Pi OS
Using the File Manager browse to & edit (Right-Click + Text Editor) the following file:
/etc/dhcpcd.conf 
Data should look like this (in this case the router basic address being 192.168.0.1 and the static address assigned to the Pi 192.168.0.199):
interface eth0
static ip_address=192.168.0.199/24
static routers=192.168.0.1
static domain_name_servers=192.168.0.1 8.8.8.8
Save & Close!
Reference: https://www.raspberrypi.org/documentation/configuration/tcpip/
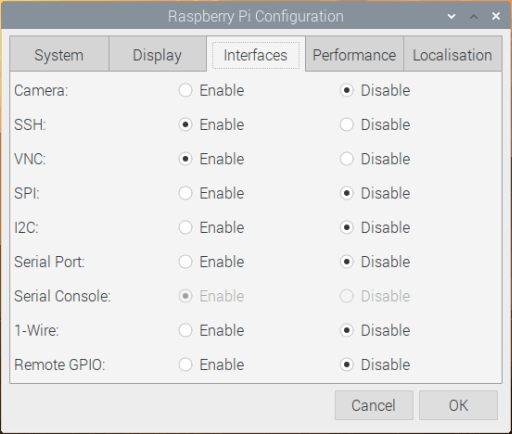
4- Enable SSH
In your Raspberry Pi:
(Menu) Preferences → Raspberry Pi Configuration → Interfaces → SSH (Enable) → OK
Reference: https://linuxize.com/post/how-to-enable-ssh-on-raspberry-pi/
5- In your router, setup port forwarding 80 and 443 to your Raspberry Pi Fixed IP

Reference: https://www.tp-link.com/us/user-guides/archer-c80_v1/chapter-10-nat-forwarding#ug-sub-title-1
6- Pi OS: Enable UFW (firewall) using terminal
Allow port 22 for SFTP, port 80 for HTTP and port 443 for HTTPS.
sudo apt install ufw
sudo ufw allow 22
sudo ufw allow 80
sudo ufw allow 443
sudo ufw enable
7- Pi OS: Installing fail2ban
Fail2ban, written in Python, is a scanner that examines the log files produced by the Raspberry Pi, and checks them for suspicious activity. It catches things like multiple brute-force attempts to log in, and can inform any installed firewall to stop further login attempts from suspicious IP addresses.
Install fail2ban via terminal using the following commands:
sudo apt install fail2ban
sudo cp /etc/fail2ban/jail.conf /etc/fail2ban/jail.local
sudo nano /etc/fail2ban/jail.local
Add the following section at the end of the jail.local:
[ssh]

enabled  = true
port     = ssh
filter   = sshd
logpath  = /var/log/auth.log
maxretry = 6
Ctrl-S to save and Ctrl-X to quit
Reference: https://www.raspberrypi.org/documentation/configuration/security.md
8- Foundry/Node.js/nginx Installation:
**If you intend on running multiple instances and are following another guide parallel to this one, I really recommend not setting up crontab yet (wait till the end)**
Node install
To install Foundry as a server, you need to install Node.js.
Node.js® is a JavaScript runtime built on Chrome’s V8 JavaScript engine.
In terminal:
sudo apt install -y libssl-dev
curl -sL https://deb.nodesource.com/setup_14.x | sudo bash -
sudo apt install -y nodejs
Foundry Install
In terminal, create directories for the application:
mkdir foundry
mkdir data
Install the software:
At this step, you will need a temporary download URL from the Foundry VTT website (https://foundryvtt.com/). This will better be done in the Pi OS browser itself. Log into your account, under “Purchased Licenses”, click the “chain” link at the right of “Node.js” and it will copy the link to your clipboard.

*Note: you have a very limited time to use it (like 5 minutes), so you’d better be ready*.
We will then change into the application directory, download the software and “unzip” it through the console. *Replace “nodejs-download-url” with your copied link.*
cd foundry
wget -O foundryvtt.zip "nodejs-download-url"
unzip foundryvtt.zip
More than one instances
For multiple instances, you will need to create extra directories (and installs), this can be achieved by copying the previous one.
Make sure that you’re in the home directory with the cd command in terminal
cd
cp -r foundry foundry2
cp -r data data2
cd foundry
Repeat for each instance.
Start running the server (or the first server for multiple instances)
node resources/app/main.js --dataPath=$HOME/dataStart your Foundry Instance in your browser with the address: “localhost:30000” (or “ipaddress:30000” if you’re working remotely on a PC) and configure the basics of your Foundry VTT install (entering the license and creating your setup password). **You don’t need to create worlds now**
Stop the server in the console window by doing Ctrl-C
Extra instances
Start the new instances (foundry2+data2, foundry3+data3 etc.) and repeat foundry config and adjust the port for each one (ex: 30001, 30002)
node $HOME/foundry2/resources/app/main.js --dataPath=$HOME/data2Stop the server in the console window by doing Ctrl-C
Repeat as required
Nginx Installation
Nginx is the proxy server that will allow you to access your Foundry VTT install from your subdomain (DDNS) name.
Installation (in terminal)
sudo apt install nginxStart server (in terminal)
sudo systemctl start nginxVisit “localhost” (or IP Address if you are working from another machine) in your browser to verify that it is running correctly
You should see a page entitled “Welcome to nginx!”

Close the browser and go back to console
Let’s create the configuration file. Replace “mysite.com” with your high-level domain name you are going to use (only one file is required even if you use multiple worlds on multiple subdomains, they will be specified individually in the config file itself)
Example: If you plan to use “myfoundry.ddnservicex.com”, name your file “ddnsservicex.com.conf”
sudo nano /etc/nginx/sites-enabled/mysite.com.confCopy and paste the text below changing mysite.com to your domain (or subdomain) you will use.
# Define Server
server {

    # Enter your fully qualified domain name
    server_name             mysite.com;

    # Listen on port 80 without SSL certificates
    listen                  80;

    # Sets the Max Upload size to 300 MB
    client_max_body_size 300M;

    # Proxy Requests to Foundry VTT
    location / {

        # Set proxy headers
        proxy_set_header Host $host;
        proxy_set_header X-Forwarded-For $proxy_add_x_forwarded_for;
        proxy_set_header X-Forwarded-Proto $scheme;

        # These are important to support WebSockets
        proxy_set_header Upgrade $http_upgrade;
        proxy_set_header Connection "Upgrade";

        # Make sure to set your Foundry VTT port number
        proxy_pass http://localhost:30000;
    }
}
Ctrl+S to save and Ctrl+X to exit
Multiple instances
For two (or more instances) use this one instead. Replace mysite.com with your first subdomain, mysecondsite.com with your second domain and so forth. And each instance should run on a different port , ex: 1st one 30000, second one 30001 etc.
# First Server
server {

    # Enter your fully qualified domain name
    server_name             mysite.com;

    # Listen on port 80 without SSL certificates
    listen                  80;

    # Sets the Max Upload size to 300 MB
    client_max_body_size 300M;

    # Proxy Requests to Foundry VTT
    location / {

        # Set proxy headers
        proxy_set_header Host $host;
        proxy_set_header X-Forwarded-For $proxy_add_x_forwarded_for;
        proxy_set_header X-Forwarded-Proto $scheme;

        # These are important to support WebSockets
        proxy_set_header Upgrade $http_upgrade;
        proxy_set_header Connection "Upgrade";

        # Make sure to set your Foundry VTT port number
        proxy_pass http://localhost:30000;
    }
}

# Second Server
server {

    # Enter your fully qualified domain name
    server_name             mysecondsite.com;

    # Listen on port 80 without SSL certificates
    listen                  80;

    # Sets the Max Upload size to 300 MB
    client_max_body_size 300M;

    # Proxy Requests to Foundry VTT
    location / {

        # Set proxy headers
        proxy_set_header Host $host;
        proxy_set_header X-Forwarded-For $proxy_add_x_forwarded_for;
        proxy_set_header X-Forwarded-Proto $scheme;

        # These are important to support WebSockets
        proxy_set_header Upgrade $http_upgrade;
        proxy_set_header Connection "Upgrade";

        # Make sure to set your Foundry VTT port number
        proxy_pass http://localhost:30001;
    }
}
Ctrl-S to save and Ctrl-X to exit
Next let’s modify the options.json file in the Foundry “data” folder. Again replace mysite.com with your domain (or subdomain) you will use for that instance (or for instance one if you run multiple ones).
Make sur you are in the home directory using “cd” in the console.
cdnano data/Config/options.json"hostname": "mysite.com",
"routePrefix": null,
"sslCert": null,
"sslKey": null,
"port": 30000,
"proxyPort": 80Ctrl-S to save and Ctrl-X to exit
Let’s do the same for each extra instance
nano data2/Config/options.json"hostname": "mysecondsite.com",
"port": 30001,Ctrl-S to save and Ctrl-X to exit
Repeat as required.
To use the same data for multiple instances using symbolic links, please refer to this guide (as I haven’t tried it myself) https://linuxsupport.tech/how-to-host-foundry-vtt-on-raspberry-pi/#running-simultaneous-worlds
Let’s test and reload NGINX
sudo nginx -t
sudo systemctl reload nginx
If you get the error: “could not build the server_names_hash, you should increase server_names_hash_bucket_size: 32” edit nginx.conf and uncomment the line (remove # sign) to change it to 64. If the error repeats with 64, change the number by the power of two (64 to 128 and so forth).
sudo nano /etc/nginx/nginx.confserver_names_hash_bucket_size: 64 #uncomment this lineCtrl-S to save and Ctrl-X to exit
More info on this error here: https://gist.github.com/muhammadghazali/6c2b8c80d5528e3118613746e0041263
Reference: https://linuxsupport.tech/how-to-host-foundry-vtt-on-raspberry-pi/
If for any reasons you need to restore/reinstall NGINX (that happened to me when I corrupted a config file) here’s how (NOTE all the configurations will need to be redone afterwards):
sudo apt-get purge nginx nginx-common nginx-full
sudo apt-get install nginx
Reference: https://stackoverflow.com/questions/12362967/how-can-i-restore-etc-nginx
9- SSL
Install Snap for Certbot:
Via terminal type the following commands one at a time
sudo apt update
sudo apt install snapd
sudo reboot
sudo snap install core
Reference: https://snapcraft.io/docs/installing-snap-on-raspbian
Install Certbot:
Via terminal type the following commands one at a time
sudo snap refresh core
sudo snap install --classic certbot
sudo ln -s /snap/bin/certbot /usr/bin/certbot
sudo certbot --nginx
Reference: https://certbot.eff.org/lets-encrypt/debianbuster-nginx
10- Crontab (autostart Nginx & Foundry): In Terminal edit crontab
crontab -eAdd these lines to the end (adjust if you changed the recommended location for the Foundry server)
@reboot sudo systemctl start nginx
@reboot node $HOME/foundry/resources/app/main.js --dataPath=$HOME/data &
If you have other instances, add similar lines:
@reboot node $HOME/foundry2/resources/app/main.js --dataPath=$HOME/data2 &
Ctrl-S to save Ctrl-X to exit
11- Browse files through SFTP
With your Windows PC (on the same network), using FTP software like WinSCP or Filezilla you can connect to your Raspberry Pi to transfer files directly using the SFTP protocol.
Your connection data should look like this:
host: Pi fixed ip address (ex: 192.168.0.199)
port: 22
user: pi (or other if you changed it)
password: defined password at Pi setup
12- SSH using Windows 10 (remote terminal)
In the Windows 10 taskbar searchfield (at the right of the Windows button) or in Windows Command prompt, type the following command (replace <IP> with the IP address of the Raspberry Pi) and press enter:
ssh pi@<IP>Example: ssh pi@192.168.0.1.199
You should be prompted for your password and then you’ll be on (remote) terminal mode.

Reference: https://www.raspberrypi.org/documentation/remote-access/ssh/windows10.md
13- VNC (Virtual Network Computing)
VNC is already installed on the full Raspberry Pi OS image, and can be installed via Recommended Software from the Preferences menu on other versions.
In your Raspberry Pi:
(Menu) Preferences → Raspberry Pi Configuration → Interfaces → VNC (Enable) → OK
On your Windows PC install VNC Viewer from here: https://www.realvnc.com/fr/connect/download/viewer/
Enter your Raspberry Pi’s private IP address into VNC Viewer and you’ll be in!

Note: There’s also a free cloud service (for personal usage) so you can connect from anywhere (there’s also an Android app)
For more details: https://www.raspberrypi.org/documentation/remote-access/vnc/
14- Backups! (Clone SD Card)
I really recommend creating a full backup of your new install (setup) on another SD card by cloning it with the SD Card Copier application (already available in the Pi OS).
The SD Card Copier application, which can be found on the Accessories menu of the Raspberry Pi Desktop, will copy Raspberry Pi OS from one card to another. To use it, you will need a USB SD card writer.
To back up your existing Raspberry Pi OS installation, put a blank SD card in your USB card writer and plug it into your Pi, and then launch SD Card Copier. In the ‘Copy From Device’ box, select the internal SD Card. This could have a number of different names, and may have something like (/dev/mmcblk0) in its entry, but will usually be the first item in the list. Then select the USB card writer in the ‘Copy To Device’ box (where it will probably be the only device listed). Press ‘Start’. The copy, depending on the size of the SD card, can take ten or fifteen minutes, and when complete you should have a clone of your current installation on the new SD card.

You can test it by putting the newly-copied card into the Pi’s SD card slot and booting it; it should boot and look exactly the same as your original installation, with all your data and applications intact.
You can run directly from the backup, but if you want to recover your original card from your backup, simply reverse the process – boot your Pi from the backup card, put the card to which you want to restore into the SD card writer, and repeat the process above.
The program does not restrict you to only copying to a card the same size as the source; you can copy to a larger card if you are running out of space on your existing one, or even to a smaller card (as long as it has enough space to store all your files – the program will warn you if there isn’t enough space). It has been designed to work with Raspberry Pi OS and NOOBS images; it may work with other OSes or custom card formats, but this is not guaranteed.
The only restriction is that you cannot write to the internal SD card reader, as that would overwrite the OS you are actually running, which could break the installation completely.
Note, everything on the destination card will be overwritten, so ensure you do not have any critical data on it before starting the copy.
Source: https://www.raspberrypi.org/documentation/linux/filesystem/backup.md
15- Add Temperature Display to Raspberry Pi OS
To add the temperature to the top panel:
Right click on the top panel
Select “Add / Remove Panel items”
Click “Add”
Scroll down the list and select “Temperature Monitor”
Click “Add”
Use the “Up” button to position the monitor above the “Digital Clock”

Source: https://www.raspberrypi-spy.co.uk/2020/11/raspberry-pi-temperature-monitoring/
16- CPU, RAM and SWAP usage
If you want to monitor your processing and memory usage, I recommend using HTOP.
You can easily install it through the console with this command:
sudo apt-get update && sudo apt-get install htopThen simply type the following in the console to open it:
htop
17- *NEW* Move your install to an external SSD
Even though moving to an SSD is a great choice, I really recommend setting up your initial build on an SD Card as it uses the built-in Raspberry Pi reader and it’s much more convenient. Once you are fully functional and happy with your setup, let’s begin the fun!
Note: This is based on the premises that both your Foundry install and your Data Folders are on the same drive.
All you need is an external SSD USB Adapter and, of course, an SSD Drive.
Note: If you are not using the latest Raspberry Pi 4 (or encounter some issues), here’s a good article on booting up from a USB device: Booting my Raspberry Pi 4 from a USB device | ZDNet
IMPORTANT: There are some known issues with the Raspberry Pi and some external adapters using some JMicron Chipset, I really recommend skipping that model if you can.
If you can’t, there’s a (semi complicated) workaround that you can find here: https://www.raspberrypi.org/forums/viewtopic.php?f=28&t=245931
Personally I’m using this model without any issues: UGreen USB 3.0 to SATA III Hard Drive Enclosure with this SSD: Silicon Power 128GB SSD 3D NAND TLC A58
► Partition/Format your external drive on a computer, exFat/FAT32/NTFS should all be fine, it’s only to make the disc easily discoverable by the Pi.
If you don’t know how to do this step, there are tons of tutorials and apps out there, and I recommend a Google (or YouTube) search based on your computer type and operating system.
For Windows 10: Create and format a hard disk partition
Still there are a lot of free apps available that can simplify the task.
► Plug-in your newly formatted drive into your Raspberry Pi, it should be discovered quite quickly.
► Using SD Card copier (refer to step 14) copy the content of your SD Card to your SSD.
Note: Even though the app is called “SD Card” copier, it’s in fact a “drive” copier and works perfectly with external drives, it can also copy from drives with different sizes (it will automatically resize the partition) as long as the target drive has enough space.
► Once completed, close the app, shutdown your Raspberry Pi, remove power and then remove the SD Card (leave only your SSD plugged in). Reinstate power, and restart your Raspberry Pi it should now boot from your external SSD and you’re done!
Note: I really recommend getting a second external drive for backup purposes, which can easily be done by plugging in the second drive and using SD Card Copier.
18- *NEW* Updating Raspberry Pi and Node.js to the latest version
Please consult this document: Updating Raspberry Pi and Node.js to the latest version – martinpilon.ca